【注意】最后更新于 September 12, 2021,文中内容可能已过时,请谨慎使用。
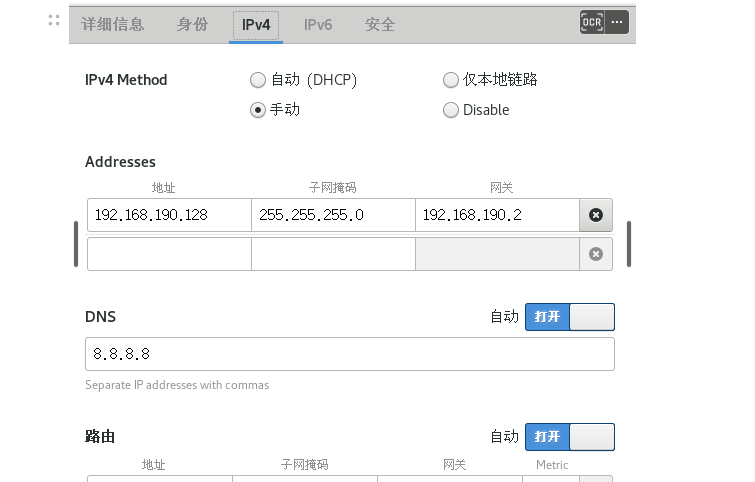
安装完成,配置静态ip (使用 NAT 方式)
可以使用 gui 自带的桌面网络管理器配置,也可以更改配置文件
- 网段要跟 Windows vmnet8 相同
- 修改 /etc/sysconfig/network-script/ 网卡
 1
 2
 3
 4
 5
 6
 7
 8
 9
10
11
12
13
14
15
16
17
18
19
20
|
TYPE="Ethernet"
PROXY_METHOD="none"
BROWSER_ONLY="no"
BOOTPROTO="none"
DEFROUTE="yes"
IPV4_FAILURE_FATAL="no"
IPV6INIT="yes"
IPV6_AUTOCONF="yes"
IPV6_DEFROUTE="yes"
IPV6_FAILURE_FATAL="no"
IPV6_ADDR_GEN_MODE="stable-privacy"
NAME="ens33"
UUID="25a4bc4a-91ba-4a19-8bbd-ec06c181a1f1"
DEVICE="ens33"
ONBOOT="yes"
IPADDR="192.168.190.128"
PREFIX="24"
GATEWAY="192.168.190.2"
DNS1="8.8.8.8"
IPV6_PRIVACY="no"
|
互相 ping 看是否联通
- 虚拟机 ping 不通 宿主机
网络配置是否为 NAT ,更改网络配置文件后要重启电脑,或者重启网络服务.
1
|
systemctl restart network
|
- 虚拟机 ping 不通 www.baidu.com 等域名
看是否配置 DNS 服务器
- 宿主机 ping 不通 虚拟机
看宿主机防火墙是否拦截, 虚拟机防火墙是否拦截
临时关闭虚拟机防火墙 systemctl stop firewalld || systemctl stop iptables
禁止开机自启防火墙 systemctl disable firewalld
开机自启防火墙 systemctl enable firewalld
要使用共享目录,必须要安装 vmware, 有时候虚拟机的 安装 vmware tool 是灰色的.无法安装
关机重启虚拟机, 进入虚拟机还未开机时 会发现是可以 重新安装的了. 剩下的就是 解压 安装了.
共享目录每次重启都失效
设置永久挂载
看看没有的话在最末行添加命令
1
|
.host:/ `**`/mnt/hgfs`**` fuse.vmhgfs-fuse allow_other 0 0
|
查看共享目录名
查看所有systemctl 管理的服务
1
|
systemctl list-unit-files
|
这里的服务都可以使用上面的方式管理启动,停止,禁止自启,开机自启.
yum软件包管理
- 安装 yum install -y
- 卸载 yum erase | yum -e
- 检查更新 yum update
安装 fish
简单不需要配置, 但不兼容 bash 脚本,在执行 bash 脚本时使用 bash 来运行. 平时用来做命令提示
centos 7
1
2
3
|
cd /etc/yum.repos.d/
wget https://download.opensuse.org/repositories/shells🐟release:3/CentOS_7/shells🐟release:3.repo
yum install fish -y
|
使用 fish 命令开启,可以使用 chsh -s 来配置成默认终端 shell ,但不推荐
安装 go g版本管理工具
 1
 2
 3
 4
 5
 6
 7
 8
 9
10
11
12
13
|
$ curl -sSL https://raw.githubusercontent.com/voidint/g/master/install.sh | bash
$ echo "unalias g" >> ~/.bashrc # 可选。若其他程序(如'git')使用了'g'作为别名。
$ source ~/.bashrc # 或者 source ~/.zshrc

$ vim  ~/.bashrc # append
export GOROOT="${HOME}/.g/go"
export PATH="${HOME}/.g/go/bin:$PATH"
export G_MIRROR=https://golang.google.cn/dl/


source ~/.bashrc # 或source ~/.zshrc

go env -w GOPROXY=https://goproxy.cn,direct # proxy
|
配置代理
使用 宿主机的代理
- 配置宿主机的ip host 映射
vim /etc/hosts
192.168.190.1 host.com
- 使用 export 配置临时代理
export http_proxy=http://host.com:7890
export https_proxy=$http_proxy
- 写入到 .bashrc 中,使用别名,并不直接设置,好清空
1
2
|
alias proxy="export http_proxy=http://192.168.190.1:7890 && export https_proxy=$http_proxy"
alias unproxy="unset http_proxy && unset https_proxy"
|
source ~/.bashrc
安装 hugo
1
2
3
4
5
|
mkdir $HOME/src
cd $HOME/src
git clone https://github.com/gohugoio/hugo.git
cd hugo
go install
|
关闭 firewalld 开启 iptables
1
2
3
4
5
6
7
8
9
|
systemctl stop firewalld

systemctl disable firewalld

yum search iptables-services

systemctl start iptables

systemctl enable iptables
|
创建服务
 1
 2
 3
 4
 5
 6
 7
 8
 9
10
11
12
13
14
15
16
17
18
19
20
|
vim /usr/lib/systemd/system/frps.service

[Unit]
Description=frps
After=network.target

[Service]
TimeoutStartSec=30
ExecStart=/usr/local/bin/frps -c /etc/frp/frps.ini
ExecStop=/bin/kill $MAINPID

[Install]
WantedBy=multi-user.target


systemctl enable frps
systemctl start frps
systemctl status frps

# systemctl enable frps.service
|
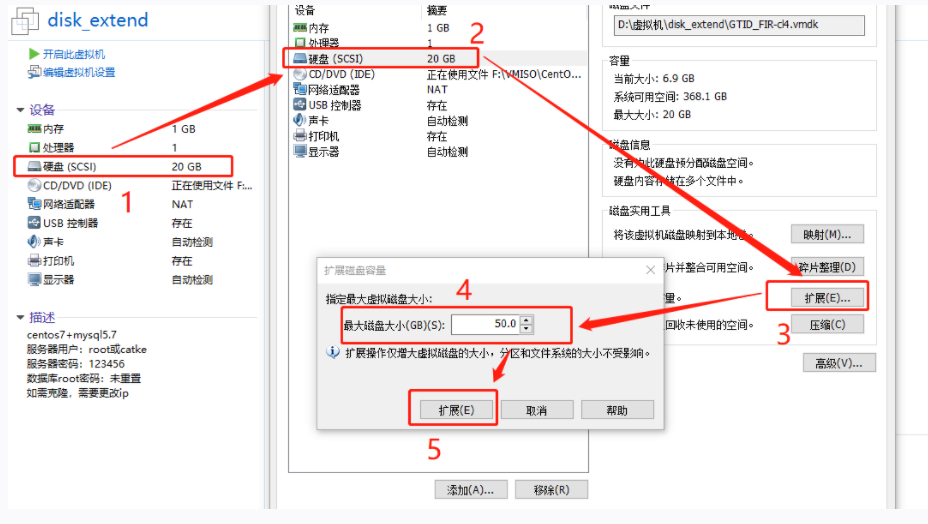
虚拟机扩容
- vmware 扩容
需要删除所有快照
- 进入linux 查看磁盘信息
df -h 查看磁盘信息
ls /dev/ 查看设备信息 | fdisk -l
- 对磁盘进行分区
fdisk /dev/sda
n 新建
p 主分区
完成后 w 保存 ,重启
- 扩容
查看磁盘信息 fdisk -l
查看卷信息 vgdisplay
创建物理卷 pvcreate /dev/sda3
扩展到物理卷 vgextend centos_caoayu /dev/sda3
再次查看卷信息,发现有 free 空间
扩展 lvextend -L +50G /dev/mapper/centos_caoayu-root
查看 pvdisplay 发现多出一个
- 扩容文件系统
resize2fs /dev/mapper/centos_caoayu-root
- 使用 df-h 查看容量是否扩容成功
常用软件及库
1
2
|
yum install tree -y \
yum install
|
 个人内容记录
 次阅读
次阅读