【注意】最后更新于 October 26, 2022,文中内容可能已过时,请谨慎使用。
wsl2安装配置
抛弃,性能太差,虚拟机代替
官方文档
https://learn.microsoft.com/zh-cn/windows/wsl/
开启
先卸载关闭
1
2
3
4
5
6
7
8
|
# 查看
wslconfig /l
# 卸载
wslconfig /u
# 关闭
wsl --shutdown
|
windows 组件关闭
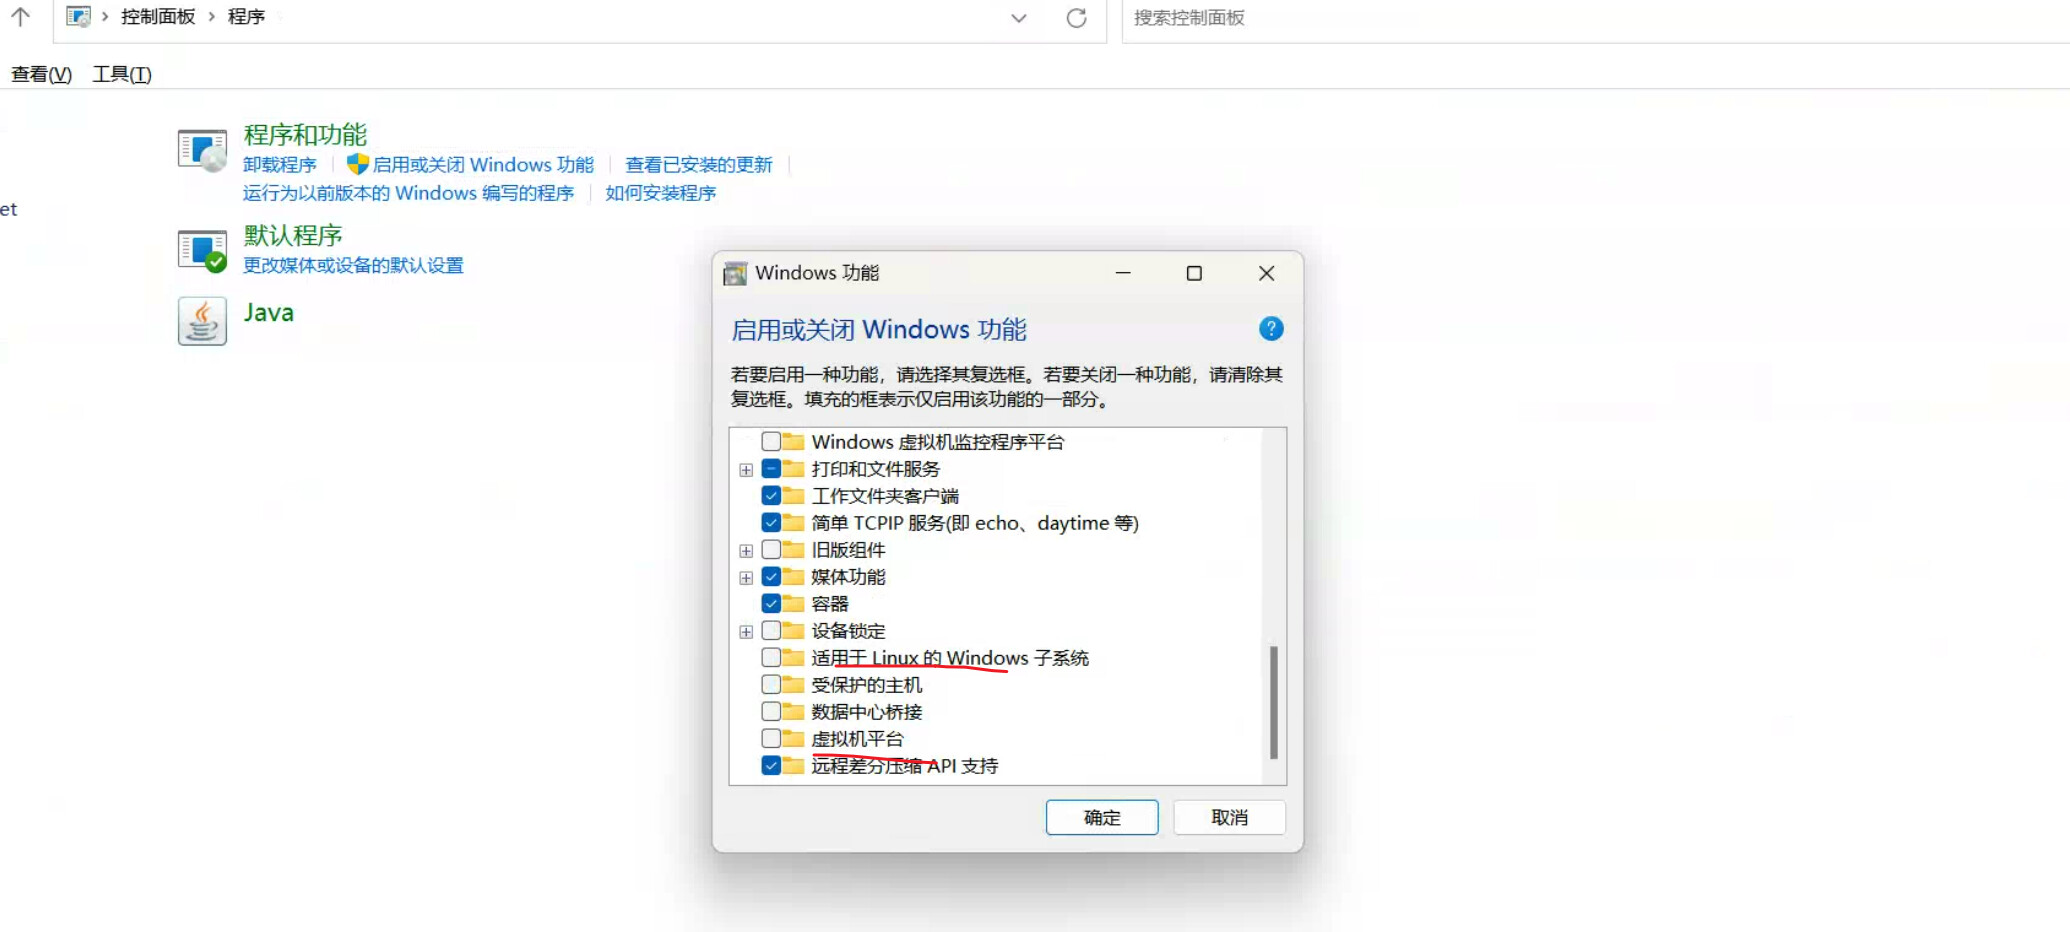 关闭后重启
关闭后重启
打开
可以在控制面板里开启, 也可以在终端中开启,下面在管理员身份打开的 powershell 中开启。
1
2
3
4
5
6
7
8
|
# 安装适用于 Linux 的 Windows 子系统

dism.exe /online /enable-feature /featurename:Microsoft-Windows-Subsystem-Linux /all /norestart

# 启用“虚拟机平台”可选组件
dism.exe /online /enable-feature /featurename:VirtualMachinePlatform /all /norestart
|
启用后同样需要重启电脑。
使用 scoop 安装 lxrunoffline 来管理 wsl2
1
2
|
scoop install lxrunoffline
|
安装 wsl2
-
设置默认为 wsl2
wsl --set-default-version 2
-
首先检查并更新系统,然后打开 windows 更新及接受其他产品的更新
-
更新 wsl wsl --update
- 如果更新不了到网页下载更新 https://www.catalog.update.microsoft.com/Search.aspx?q=wsl 。版本要一致。
wsl --status 查看版本。
- 然后下载 linux 内核安装 地址:https://github.com/microsoft/WSL2-Linux-Kernel/releases
-
如果安装提示 This update only applies to machines with the Windows Subsytem for Linux 或者安装不了,使用 powershell 用管理员身份运行 sudo .\wsl_update_x64.msi
-
报错:安装过程中出现错误。分发名称: ‘Ubuntu 20.04 LTS’ 错误代码: 0x80072efd
-
列出所有在线的可用发行版
wsl --list --online
-
到微软商店安装 linux 发行版 或者使用 wsl 命令
wsl --install -d Ubuntu-20.04
-
如果安装不了,就下载 Ubuntu-20.04 的离线 appx 包,使用 Add-AppPackage -Path .\Ubuntu_2004.2020.424.0_x64.appx 安装
wsl ubuntu20.04 配置
开发用虚拟机,wsl 主要用来同步 windows 跟 linux 上的一些命令跟操作,比如终端提示。并不使用他来开发,作为一个工具使用。
首先更改 root 用户密码 sudo passwd root
修改源
先更新 sudo apt update
 1
 2
 3
 4
 5
 6
 7
 8
 9
10
11
12
13
14
15
16
17
18
19
20
21
22
23
24
25
26
|
sudo cp /etc/apt/sources.list /etc/apt/sources.list.bak
su root

cat  << EOF > /etc/apt/sources.list
deb https://mirrors.ustc.edu.cn/ubuntu/ jammy main restricted universe multiverse
deb-src https://mirrors.ustc.edu.cn/ubuntu/ jammy main restricted universe multiverse

deb https://mirrors.ustc.edu.cn/ubuntu/ jammy-security main restricted universe multiverse
deb-src https://mirrors.ustc.edu.cn/ubuntu/ jammy-security main restricted universe multiverse

deb https://mirrors.ustc.edu.cn/ubuntu/ jammy-updates main restricted universe multiverse
deb-src https://mirrors.ustc.edu.cn/ubuntu/ jammy-updates main restricted universe multiverse

deb https://mirrors.ustc.edu.cn/ubuntu/ jammy-backports main restricted universe multiverse
deb-src https://mirrors.ustc.edu.cn/ubuntu/ jammy-backports main restricted universe multiverse

## Not recommended
# deb https://mirrors.ustc.edu.cn/ubuntu/ jammy-proposed main restricted universe multiverse
# deb-src https://mirrors.ustc.edu.cn/ubuntu/ jammy-proposed main restricted universe multiverse

EOF

# 更新
sudo apt upgrade -y
sudo apt update -y
|
常用命令
 1
 2
 3
 4
 5
 6
 7
 8
 9
10
11
12
13
14
15
16
17
|
sudo apt-get update  更新源
sudo apt-get install package 安装包
sudo apt-get remove package 删除包
sudo apt-cache search package 搜索软件包
sudo apt-cache show package  获取包的相关信息,如说明、大小、版本等
sudo apt-get install package --reinstall  重新安装包
sudo apt-get -f install  修复安装
sudo apt-get remove package --purge 删除包,包括配置文件等
sudo apt-get build-dep package 安装相关的编译环境
sudo apt-get upgrade 更新已安装的包
sudo apt-get dist-upgrade 升级系统
sudo apt-cache depends package 了解使用该包依赖那些包
sudo apt-cache rdepends package 查看该包被哪些包依赖
sudo apt-get source package  下载该包的源代码
sudo apt-get clean && sudo apt-get autoclean 清理无用的包
sudo apt-get check 检查是否有损坏的依赖
|
安装常用软件
1
|
sudo apt install -y gcc g++ vim lsof gdb autoconf automake neofetch w3m net-tools git wget ca-certificates make zsh w3m
|
字体配置
1
2
|
sudo apt install font-manager -y
font-manager
|
配置别名及环境变量
将文件放到 /www/my-bash 目录中,在 .bashrc 中直接 source 引入
去除 sudo 密码
1
2
3
4
5
6
7
|
sudo cp /etc/sudoers /etc/sudoers.old
sudo chmod +w /etc/sudoers
sudo vim /etc/sudoers
# 加上如下行
%caoayu ALL=(ALL) NOPASSWD:ALL

sudo chmod u-w /etc/sudoers
|
如果忘记密码
使用 wsl -u root 命令进入并修改密码
打开 wsl2 中文件对应在 windwos 上的目录
explorer.exe .
使用 Linux 文件系统根目录:\wsl$<DistroName>\home<UserName>\Project
而不使用 Windows 文件系统根目录:C: \Users<UserName>\Project
在 windows 上使用 wsl2 工具
从 Windows 命令行运行 Linux 工具:打开 PowerShell,通过输入以下内容使用 Linux ls -la 命令显示 C: \temp> 的目录内容:wsl ls -la
混合 Linux 和 Windows 命令:在此示例中,使用 Linux 命令 ls -la 列出目录中的文件,然后使用 PowerShell 命令 findstr 筛选包含“git”的单词的结果:wsl ls -la | findstr “git”。 这还可以通过混合使用 Windows dir 命令和 Linux grep 命令来实现:dir | wsl grep git。
直接从 WSL 命令行运行 Windows 工具:xxx.exe。例如,若要打开 .bashrc 文件(启动 Linux 命令行时运行的 shell 脚本),请输入:notepad.exe .bashrc
使用 Linux Grep 工具运行 Windows ipconfig.exe 工具:ipconfig.exe | grep IPv4 | cut -d: -f2。此示例演示了 Windows 文件系统上的 ipconfig 工具,该工具用于显示当前 TCP/IP 网络配置值,然后通过 Linux 工具 grep 被筛选为仅 IPv4 结果。
fish 代替 zsh 等
默认使用 bash,手动 fish 启用,需要执行脚本换回 bash
1
2
|
suto apt install fish
fish-config
|
oh-my-zsh
先安装 zsh,然后使用 gitee 上的脚本,github 服务器拉取太慢
如果版本太低,先下载高版本,然后编译安装
1
2
3
4
5
6
7
|
wget https://jaist.dl.sourceforge.net/project/zsh/zsh/5.8/zsh-5.8.tar.xz
tar xvf zsh-5.8.tar.xz
./configure
make && make install
echo /usr/local/bin/zsh >> /etc/shells
chsh -s /usr/local/bin/zsh
zsh --version
|
直接 apt 安装
 1
 2
 3
 4
 5
 6
 7
 8
 9
10
11
12
13
14
15
16
17
|
sudo apt install zsh -y

# 1. 改仓库安装 oh-my-zsh
curl  https://gitee.com/mirrors/oh-my-zsh/raw/master/tools/install.sh -o zsh-install.sh
chmod a+x zsh-install.sh
vim zsh-install.sh

# 2. 直接gitee 安装
sh -c "$(curl -fsSL https://gitee.com/Devkings/oh_my_zsh_install/raw/master/install.sh)"

# autosuggestions
git clone https://gitee.com/skarner/zsh-autosuggestions.git $ZSH_CUSTOM/plugins/zsh-autosuggestions
# highlighting
git clone https://gitee.com/Annihilater/zsh-syntax-highlighting.git $ZSH_CUSTOM/plugins/zsh-syntax-highlighting

# 修改 .zshrc 文件,把这两个插件开启。
# 安装后使用 omz命令操作
|
如果报错 zsh: corrupt history file /root/.bash_history
删除 .zhistory 重建文件
systemd 服务
查看所有运行的服务 service --status-all
开启服务: sudo service mongodb start
wsl2 原生支持了 systemctl,编辑 /etc/wsl.conf
配置后需要重启 wsl --shutdown
使用 systemctl list-unit-files --type=service 确认是否生效
设置开机自启:sudo systemctl enable ssh
systemctl 命令
1
2
3
4
|
git clone https://github.com/DamionGans/ubuntu-wsl2-systemd-script.git
cd ubuntu-wsl2-systemd-script/
bash ubuntu-wsl2-systemd-script.sh
# Enter your password and wait until the script has finished
|
这个服务可能会导致 wsl 打不开
1
2
3
4
5
6
7
8
9
10
11
12
13
14
15
16
17
18
19
20
|
wsl -e bash --norc
sudo vim /usr/sbin/enter-systemd-namespace
# 替换下面内容
USER_HOME="$(getent passwd | awk -F: '$1=="'"$SUDO_USER"'" {print $6}')"
if [ -n "$SYSTEMD_PID" ] && [ "$SYSTEMD_PID" != "1" ]; then
if [ -n "$1" ] && [ "$1" != "bash --login" ] && [ "$1" != "/bin/bash --login" ]; then
exec /usr/bin/nsenter -t "$SYSTEMD_PID" -m -p \
/usr/bin/sudo -H -u "$SUDO_USER" \
/bin/bash -c 'set -a; [ -f "$HOME/.systemd-env" ] && source "$HOME/.systemd-env"; set +a; exec bash -c '"$(printf "%q" "$@")"
else
exec /usr/bin/nsenter -t "$SYSTEMD_PID" -m -p \
/bin/login -p -f "$SUDO_USER" \
$([ -f "$USER_HOME/.systemd-env" ] && /bin/cat "$USER_HOME/.systemd-env" | xargs printf ' %q')
fi
echo "Existential crisis"
exit 1
fi
bash ubuntu-wsl2-systemd-script.sh --force
|
重启 wsl2 生效
git 配置
1
2
3
|
git config --global user.name "caoayu"
git config --global user.email "[email protected]"
git config --global core.autocrlf true
|
sshd 配置
1
2
3
|
sudo apt-get purge openssh-server -y
sudo apt-get install openssh-server -y
sudo ssh-keygen -A
|
修改 sudo vi /etc/ssh/sshd_config
1
2
3
4
5
|
Port 22
ListenAddress 0.0.0.0
PermitRootLogin yes
PasswordAuthentication yes
|
sudo service ssh restart
固定 wsl2 与宿主机 的 IP 地址
直接编写 bash 脚本,动态写到 win hosts 文件中,其他方式太麻烦。
1
2
3
4
5
6
7
8
9
10
11
12
13
14
15
16
17
18
19
20
21
22
23
24
25
26
27
28
29
30
31
|
#!/usr/bin/bash
# 为 win 设置 wsl host
# win hosts 文件路径
win_hosts_path="/mnt/c/Windows/System32/drivers/etc/hosts"
# 为 wsl2 设置的域名
wsl_domain="ubuntu ubuntu74 ubuntu71 ubuntu56 ubuntu80"
# 获取 wsl2 的 ip
wsl_ip=$(ifconfig eth0 | grep -w inet | awk '{print $2}')
# 判断是否已存在 wsl2 的域名,如果存在则修改,否则追加
if grep -wq "$wsl_domain" $win_hosts_path
then
# 此处因为权限问题没有直接用 sed 修改 hosts 文件
win_hosts=$(sed -s "s/.* $wsl_domain/$wsl_ip $wsl_domain/g" $win_hosts_path)
sudo echo "$win_hosts" > $win_hosts_path
else
sudo echo "$wsl_ip $wsl_domain" >> $win_hosts_path
fi
sudo chmod 666 /etc/hosts
# 为 wsl 设置 win host
wsl_hosts_path="/etc/hosts"
win_domain="win"
win_ip=$(cat /etc/resolv.conf | grep "nameserver" | awk '{print $2}')
if grep -wq "$win_domain" $wsl_hosts_path
then
wsl_hosts=$(sed -s "s/.* $win_domain/$win_ip $win_domain/g" $wsl_hosts_path)
sudo echo $wsl_hosts > $wsl_hosts_path
else
sudo echo "$win_ip $win_domain" >> $wsl_hosts_path
fi
sudo chmod 644 /etc/hosts
|
下面的方式不使用了
- 写到 windows 上的 bat 中,放到开机自启
1
2
3
4
|
# 给wsl2设置固定IP
sudo wsl -d Ubuntu-20.04 -u root ip addr add 172.17.153.128/20 broadcast 172.17.159.255 dev eth0 label eth0:
# 给宿主机设置固定IP
netsh.exe interface ip add address "vEthernet (WSL)" 172.17.153.1 255.255.240.0
|
- 写到 wsl2 开机后的脚本中。
1
2
|
sudo ip addr add 172.17.153.128/20 broadcast 172.17.159.255 dev eth0 label eth0:
netsh.exe interface ip add address "vEthernet (WSL)" 172.17.153.1 255.255.240.0
|
- 把 172.17.153.128 写到 win 的 hosts 文件中。
172.17.153.128 wsl2
代理
使用 alias 来实现快速配置代理,把配置写到 .bashrc 文件中
1
2
3
4
5
|
PROXY="http://"
PROXY+=`route -n | grep UG | awk '{print $2}' | awk -F . '{print $1"."$2"."$3".1"}'`
PROXY+=":7890"
alias proxy="export http_proxy=$PROXY && export https_proxy=$PROXY"
alias unproxy="unset http_proxy && unset https_proxy"
|
重启 wsl2
wsl --shutdown
设置语言
1
|
sudo update-locale LANG=zh_CN.utf8
|
安装 docker
sudo apt install docker.io -y
sudo apt install docker-compose -y
wls2 中的配置
1
2
3
4
5
6
7
|
sudo mkdir -p /etc/docker
sudo tee /etc/docker/daemon.json <<-'EOF'
{
"registry-mirrors": ["https://muybs0me.mirror.aliyuncs.com"]
}
EOF
sudo service docker restart
|
![[../../0x02_Resource/docker 源]]
完整的 wsl.conf
1
2
3
4
5
6
7
8
9
10
11
|
[boot]
systemd=true
command = service docker start
command = service ssh start
[automount]
enabled = true
options = "metadata,uid=1000,gid=1000,umask=022,fmask=11"
mountFsTab = true
|
问题
下载安装不了
开系统代理,或者改 hosts,github 项目 https://github.com/521xueweihan/GitHub520
 个人内容记录
 次阅读
次阅读